4.4 KiB
4.4 KiB
Local AI and Automation Docker Suite
OK, let's get you started! At the end of the day, you only really need Ollama and an IDE (either VS Code or JetBrains), so why does this docker setup have so many different services? The reason is that this setup is here to get you started, and it takes a modular approach which, over time, is going to allow you to upgrade parts of this install at a component level. As an example, if you love what this setup brings, but want to use bigger better LLM Models? You can buy a server just for LLM Hosting, put Ollama on it, and just re-point your Open WebUI container to the new server, and everything else continues to work as normal.
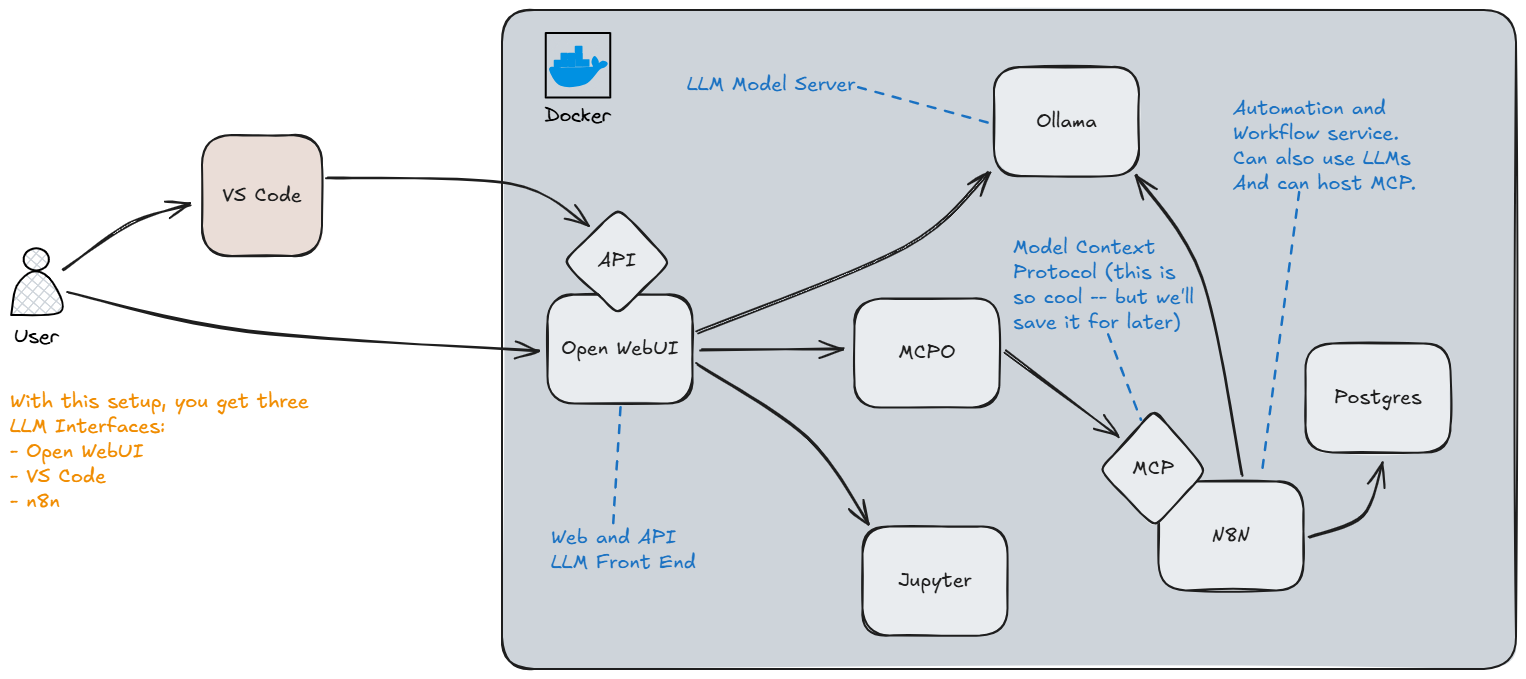
Docker Compose Contains
- Ollama (LLM Host)
- Open WebUI (Chat Interface)
- MCPO Server (Model Context Protocol relay server)
- N8N (Automation)
- PostgresDB (for N8N)
- Jupyter Notebook
Getting Started
- Make sure you have the prerequisites installed (Git, Docker Desktop)
- Clone this repo
git clone https://git.brianfertig.com/brianfertig/LocalAIChat.git LocalAIChat
Install Instructions
- Copy
sample.envto.env - Edit
.envfile to contain your ultimate secret passwords - Copy
config/mcpo/sample.config.jsontoconfig/mcpo/config.json - Note -- there is no need to edit the config.json file right away
- If you have an NVidia GPU, open
docker-compose.ymland uncomment the lines from the Ollama container - From the root directory (of this repo) run
docker compose up -d - If you experience any errors, run it again until it stands completely up
Next Steps
Once you're up and running in Docker, lets configure a few things...
- Open WebUI http://127.0.0.1:8080
- Click
Get Started - Create a new account (This will be the admin account)
- Open the sidebar (three lines on the left), click on your name, then click on
Admin Panel - Browse to
SettingsthenModelsthen click thedown arrow icon(Manage Models) - In the
Pull a model from Ollama.comfield enterqwen3:4b - Wait for this model to completely download and successfully install
- Close the
Manage Modelswindow, and clickNew Chatin the upper-left - Chat with the model to make sure it is functioning properly. (just a quick check is all that is needed to verify it's working)
- Click
Workspacefrom the left menu, then selectImport Models - Browse to the
/config/OpenWebUIdirectory in this repo, and import thesoftware-assistant.jsonfile. - Next, click your name in the lower left of the lefthand menu and then click
Settings - Click
AccountthenAPI Keysand thenCreate new secret key- Save your API key for the next part.
Configure VS Code for AI
- In VS Code, search for
Continueand install theContinue - open-source AI code assistantextension - Once it is installed you should see
Continuein VS Code's lower right corner with a check next to it. - Press
CTRL+Lto open a chat window. Just above the chat input you should seeLocal Assistantexpand this and click on theGear Iconnext toLocal Assistant. - Paste the following over the existing YAML, and edit as needed:
name: Local Assistant
version: 1.0.0
schema: v1
models:
  - name: Software Assistant
    provider: openai
    model: software-assistant-32k-context
    env:
      useLegacyCompletionsEndpoint: false
    apiBase: http://127.0.0.1:8080/api
    apiKey: {{ your API key }}
    roles:
      - chat
      - edit

  - name: Software Assistant Autocomplete
    provider: openai
    model: software-assistant-32k-context
    env:
      useLegacyCompletionsEndpoint: false
    apiBase: http://127.0.0.1:8080/api
    apiKey: {{ your API key }}
    roles:
      - autocomplete

prompts:
  - name: test
    description: Write unit tests for highlighted code
    prompt: |
      Write a comprehensive set of unit tests for the selected code. It should setup, run tests that check for correctness including important edge cases, and teardown. Ensure that the tests are complete and sophisticated. Give the tests just as chat output, don't edit any file.

context:
  - provider: code
  - provider: docs
  - provider: diff
  - provider: terminal
  - provider: problems
  - provider: folder
  - provider: codebase
- You should now be able to chat with AI in VS Code as well.